All credit is due to Rita, over at Coffeshop for this edit. I wanted to play around with one of her tutorials.
Here is the fix-it Friday picture for the week.
Original :

Fixed up:


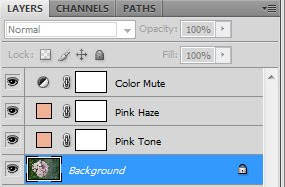
1. Pink Tone layer: Add a solid color fill layer with #eeb395 (a pinkish color) and put that layer into Overlay blending mode, 100% opacity.
2. Pink Haze layer: Add a solid color fill layer as above (#eeb395) and put that layer in Screen blending mode, 50% opacity.
3. Color Mute layer: Click on your foreground color swatch and change it to #eeb395and make the background swatch white. Add a Gradient Map adjustment layer with pink to white and put that layer in Color blending mode, 50% opacity.
4. Ctrl J the background layer and drag up to the top and adjust opacity as you like.
Then I cropped in!
Viola!
Here's one more I did on my sweetie Gretchen!!
It's from here, I just love this site!
http://coffeeteaphotography.blogspot.com/2000/02/coffeeshop-sun-kissed-pspse-action-and.html
Here's my shot!


I love your crop! The picture of your Gretchen is great!
ReplyDelete